Showing posts with label Managing Budget. Show all posts

Wednesday, August 7, 2013

Healthy Budget Friendly School Lunch: Apple Sandwich

Step 1: Find a round apple
In this installment of the healthy budget friendly school lunches, I wanted to try apple sandwiches. I saw this idea awhile back and I think it's a great convenient and pretty way to eat an apple. I cut the apple with a star shape cookie cutter and filled it with natural creamy Kroger peanut butter. Then, eat it like a sandwich. If your school is nut-free, try sunflower seed butter. It has a similar consistency as peanut butter and the taste is also nutty.

Ava's favorite snack these days is a vegan Maple Oat Brown Sugar muffin. I bake a batch and freeze them. You can pull them out from the freezer and they will be defrosted by lunch or in our case afternoon snack. Ava has an egg allergy and I like this recipe because there's no egg and it uses coconut oil. I made them for a play date and the moms and kids loved them! I use silicon muffin cups to pack them in the lunch container. Kids love the different colors.

Step 2: Slice horizontally in the middle.
Step 3: Cut out the middle with a small cookie cutter shape. Fill with peanut or other nut butter and stack.


To round out the lunch, I added vanilla organic yogurt in a separate container. A budget friendly tip is to buy yogurt in large tubs instead of the small cups. It's cheaper to buy the larger container and then you can fill small reusable containers for snacks or lunch on the go. Another tip is to buy plain yogurt and flavor the yogurt with a homemade berry sauce or pure maple syrup. I don't like to buy flavored yogurts because of the artificial ingredients so I usually read the labels and stick with something simple.

You may also include the extra apple pieces in a reusable lunch bag in case your child would like more apples. You might notice that I don't include veggies. That's a hard one for us. Ava won't eat veggies except for a few forms. I usually can get her to eat spinach in homemade fruit and yogurt smoothies and we pile in the veggies in our spaghetti and meatballs. She will eat spinach or swiss chard even in lasagna and homemade pizza. I try to fit in veggies wherever I can, even if it's just a small taste with dinner. When is comes to packed school lunches, I try to give my daughter foods that she will eat because we've established that she likes them at home. It wouldn't work for us to experiment with foods that she won't eat while she's away because she will do just go without.

Muffin, apple-peanut butter sandwich, and yogurt

Have your kids picked out a fun lunch box? Ava picked this lunch box out and she carries it with pride to school on the days we pack her lunch. Some kids are sensitive to packing lunches and eating different things than their friends. Sometimes Ava's friends make comments in the morning asking why she's eating different pancakes for example. I tell them that the pancakes aren't good for her body and they would make her sick. Her teachers tell me that for the most part, she eats her own food when I provide it without a second thought which I'm glad to hear. I believe starting her out at this early age with eating healthy foods will carry forward to her adult life, which is why I make it a priority to provide it. Plus, it's really rewarding to know that she's eating nutritious foods as her body is growing. Also check out the Kroger "Trade-Worthy School Lunches" Pinboard for more ideas from moms.

By the way...Ava really liked the star-shaped apple sandwich. She thought it was really cool!

All packed up!

Sunday, August 4, 2013

Healthy Budget Friendly School Lunch Ideas: Make Your Own Trail Mix

I started packing lunches and snacks for Ava's preschool when we discovered her egg allergy earlier this year. I also bring her a lunch on the days that she won't eat the hot lunch. I'd rather pack her a lunch than her just eating only the fruit. Healthy and budget friendly really do go together! When you cook your own meals you're saving money and you can focus on healthy ingredients for your family. I always prepare a packed lunch for our entire family. I spent about 30 minutes in the morning packing lunches for our family.

Kroger grocery stores have a fun healthy, budget friendly school lunch campaign right now. So I thought I'd join the fun. We have a Kroger just a few minutes from our house and I've been impressed with the store brand products such as cereal, peanut butter, and milk. We read the labels closely to buy healthier food options. For example, the Kroger natural creamy peanut butter is just peanuts and salt. I focus my shopping in the organic produce and natural food sections. I like the Key Ring app to store my store cards and you can access coupons in your mobile app. It's a great way to get the deals in the store without clipping the coupons.
Pretty and healthy lunch!

One of my favorite packable snacks is make-your-own trail mix. It makes a great addition to a lunch too! Depending on your mood or seasons, you can customize it with anything. I like sesame sticks because they add a salty, but healthy flair along with nuts. Yesterday, I couldn't resist these organic grapes at our local Kroger. They are delicious. I added nitrate-free ham roll-ups. Ava likes it when I roll up her ham or turkey lunch meat. And she especially loves when I cut her cheese slices into shapes.

 Healthy Lunch 1:  
  • Organic grapes 
  • Make your own Trail Mix (Kroger honey nut blitz cereal, roasted almonds, and cheddar sesame sticks)
  • Nitrate free ham lunch meat roll-up
  • Cheese stars
  • Wheat crackers in the Wexy bag
Diggin in!
I made this lunch with smaller portions because I was making it as Ava's afternoon snack. I like the concept of a "nibble tray" so this works well as a snack for young ones too.  Here's a picture after she discovered her snack when she woke from her nap. She was excited and named all of the items. Fun shapes, colors and textures are great for kids lunches to keep the interested in the food.

Watch the blog for some other healthy and budget friendly school lunch ideas.

Giveaway! I'm going to give away a $25 Kroger gift card to one of my lucky readers this week after the posts. To win you can comment on the blog or Facebook, share, or repin to enter the drawing. Add your own healthy lunch ideas to the comments! I'll do a random drawing for the winner after all the posts are up. Keep reading...


Tuesday, February 12, 2013

Kitchen Pantry Transformation

BEFORE: Free-standing shelves and piles everywhere!

BEFORE: Lots of wasted space.

Step 1: Fresh paint
I'm so excited to share our new kitchen pantry! We moved into our house three years ago and I was thrilled to have a pantry after leaving our small condo in Chicago! When we moved in, we just put our free standing shelves inside and started piling things in it, with the intention to making built-in shelves in the future.

I'm really thankful for Aaron's handy work and home project skills! He took a few days off of work early in January and spent a couple days on our new kitchen pantry. It's made such a big difference! Our pantry is organized and everything is so accessible.

I really like shopping in the bulk bins at Whole Foods for our whole grains, dried beans, seeds, and other ingredients, storing them in stacked plastic containers. In the past, I had trouble seeing and accessing everything and would buy something that I didn't need. The new shelves make it so easy to see what we have stored in the pantry!

Our Costco membership comes in handy for my bulk cooking for my freezer meals exchanges. It's nice to have extra room to store my larger items like brown rice and whole wheat flour! Here's how the project unfolded.

Step 2: Building the shelf supports.
Day 1: Planning/Unloading - After Aaron sketched out the plans, we removed everything out of the pantry and into the kitchen and living room. While we were dismantling, we threw out expired food to start with a clean slate. We had everything out for the several days while this project was underway. That evening, Aaron made a final shopping list of the building supplies he needed for the project.

Day 2: Shopping/Painting - Aaron went to the store and bought building supplies such as paint and boards. He cut the MDF boards and painted the pieces white so they would be dry the next day to install.

Step 3: Shelves are built!


Day 3: Installation/Organization - I was so excited to come home from work and see the project was complete! Aaron installed three shelves, leaving the tallest height for the top and bottom shelves. We had a plastic drawer container for loose items like party supplies, ziploc bags, and our reusable shopping bags. We store tall and heavy jugs like white vinegar that we use for house cleaning. We use the second floor area for our recycling and dog food storage bins.

Budget:  The project was very affordable! Aaron used MDF instead of solid wood. But the white paint effect makes it look really nice. He bought longer pieces and cut them to his specifications. We bought a nail gun, but he will use that tool again for future project. In the end, we spent less than $200! It's well worth it! Having pantry items clearly visible and accessible makes it easy to do an inventory of what I have on-hand so I don't over-buy items. That's another way an organized pantry saves you money down the road.

I'm thrilled with the finished project! I love seeing the white space in the pantry and extra room! I'm definitely a happy wife!

AFTER: Organized!

AFTER: View of open bottom area for recycling and dog food.

Thursday, October 21, 2010

One Whole Chicken, Three Dinners

Last Thursday, I stayed home from work sick with a fever and a terrible cold. I dropped the baby off at daycare for a few hours so I could sleep and went to Costco to pick up a few essentials. I picked up a whole Rotisserie chicken for $5 which is a great price because not only is it already cooked, but it's also growth hormone free chicken.

Meal 1: Veggie, Chicken and Brown Rice Soup - 6 servings
That night because I wasn't feeling good, I used the chicken thigh and drumstick meat to put in soup.

I started with chopping and sauteing veggies that I had on-hand in produce box: onions, celery, carrots, garlic, zucchini, and kale (here's my easy tip on cleaning leafy greens and lettuce). I added a quart of chicken broth, fresh water, seasoning, and a cup of brown rice. I brought it up to a simmer. After it was simmering for about 45 minutes, I added the chicken pieces at the end since it was already cooked. I kept the pieces of chicken fairly large, but still bite sized. I just pulled the chicken off the bone and added it to the pot.

This soup was very nourishing all weekend for me and it was so easy that it wasn't hard even being sick and by myself with the baby since Aaron was out of town.

Meal 2: Chicken Broccoli Casserole - 6 servings
On Sundays, I make a big batch of food so this casserole was great. I ate it for dinner by myself and then Monday night it was easy to reheat for us after a day at the office. I used fresh broccoli and a few other veggies since I felt I didn't have enough broccoli (only 1 pound). I used the chicken breasts and chopped them in large bit-sized pieces and combined the chicken and veggies. The recipe called for a white sauce (flour, butter, and milk with cheese and seasonings added). Then it said to soak bread pieces in a 1/2 cup of milk. It baked in the oven for about a half hour.

Make your favorite chicken casserole and serve with rice. I served mine with slices of fresh Roma tomato.

Time-saving tip: reserve the small leftover pieces from the chicken in a container and store in the refrigerator for green salads or my meal #3....

Meal 3: Chicken, Veggie, and Cheese Potato - 3 servings
Last night's dinner was really easy. We made an easy favorite meal that takes just minutes - Chicken, Broccoli, and Cheese Potato (here's the recipe). Except last night, I didn't have any more broccoli, so I used fresh steamed cauliflower. Green beans work, too. It's a baked potato with cooked chicken, broccoli/cauliflower, cheese and a dab of sour cream. I like to add sliced green onion on the top of mine.

So there you go. I used a $5 Rotisserie whole chicken and made 3 meals all week and they were all tasty and healthy. Add your favorite easy meals with using Rotisserie Chicken in the comments if you want to share!

Friday, August 20, 2010

What To Do With the Bottom of the Bag of Corn Chips

Earlier this week, I made spicy guacamole and we got to the bottom of the corn chip bag. I couldn't throw it away. It's not so much about being frugal, but I hate wasting things. I really like to find other uses for things to avoid waste.

Ever wonder what to do with the tiny broken pieces of corn chips at the bottom of the bag? They're definitely not good for dipping, that's for sure. So at the risk of sounding like a complete nerd (I have Aaron's voice in my head!), I'll share my tip. I sprinkle the small corn chip pieces on the top of a green salad. It gives the salad a little crunch and salty flavor. Here's a picture of our salads from last night. It especially tasted good with the veggies - tomatoes, carrots, cucumbers, and avocado chunks.

Another salad topper that I'm famous for is green pumpkin seeds (pepitas) and sunflower seeds. I love seeds in my salad.

Friday, January 29, 2010

Starting a New Family Tradition: Pizza Night!

Our new baby is due to arrive in about 6 weeks or so and we've been spending more Friday nights at home. Mostly because our weeks are packed full with errands, projects for the new house, getting together with friends, and date nights. We're wrapping up our 4-week Monday night Lamaze and Birth Prep class this coming Monday. We have 3 baby showers coming up in the next couple weeks so life is busy! The last few Friday nights our date nights have been at home watching movies and making homemade pizza in our new convection oven! Last week Aaron told me that our homemade pizza was better than takeout and he wants me to make more of it. What a sweetheart! Tonight, after a quick trip to my local Trader Joe's, I made this pepperoni and olive pizza, Caesar salad, and pear slices to round out the meal.

Tonight, I told Aaron that we have a new Berkey Family tradition brewing - Friday Pizza Night! I had visions tonight of making pizza as a family with the kids. I can see our daughter standing on a step-stool placing the ingredients on the pizza while I coach her. Aaron likes to slice the pizza. Back in our condo, I made lots of pizza from scratch using my KitchenAid stand mixer. That last few Friday's, I've made our pizza using the Trader Joe's pizza dough in a bag. You buy the dough ball and then roll it out at home. I like that the dough is not made with funky ingredients or hydrogenated oils and even better that it's $.99! I plan to make the dough from scratch again when I get in my groove.

How I made it:
- Preheat the oven, according to package instructions (mine was 350 and I used the convection oven setting). Roll out the dough on a floured surface with a rolling pin. Coat the pizza pan with cooking spray. Place the rolled out dough on the coated pizza pan. Use a fork to make small holes on the dough.
- Prebake the dough for 8 minutes.
- Pull out the pizza dough and add your sauce, cheese, and toppings.
- Bake for another 11-12 minutes until the pizza is golden and bubbly.
- Place pizza on a flat surface and cut it into slices.

**While the pizza baking, I make my green salad and slice the fruit. The entire process only takes about 30 minutes!

I think pizza has the power to bring a family together! Kids and parents alike love pizza! And the toppings and possibilities are endless! You can use fresh tomato slices, spinach, canadian bacon, proscuitto, basil, olives, chicken breast, pepperoni...anything! Think of all the fun you can have when you have a themed pizza and make food art!

Making your own pizza is fun and it saves you money. No need to wait endlessly for the pizza delivery on a busy Friday night. And you can ensure the quality of ingredients and nutritional value by making it at home.

So here's the birth of our Berkey Friday Pizza tradition. Your tradition doesn't have to be pizza, but my point is that traditions are the fabric of our memory. You can start a tradition with friends and have it grow into family in the future. Traditions with friends and family are healthy because of the emotional bond and trust you feel when you perform them over time. It really gives you that warm, cozy feeling inside when you can share a common tradition with your loved ones!
Posted by Picasa

Friday, January 15, 2010

Easy Tips for Weeknight: Spaghetti and Meatballs

Tonight I made a quick and easy version of spaghetti and meatballs.

Out of breadcrumbs, no problem! When I pulled out my ingredients, I remembered that I'm out of breadcrumbs. Not to fear! I used the heels from the whole wheat bread loafs that we already have on hand. You drop in the bread in the food processor and give it a whirl for about 1 minute until you have crumbs. Using fresh bread, your crumbs will be soft, moist, and airy. Even better, you can avoid the additives found in traditional store-bought breadcrumbs like hydrogenated fats and use better quality ingredients that you might throw away anyway! That's cost savings that is good for your health, too!

Easy meatballs under the broiler. Check out my previous post for a foolproof method for making meatballs under the broiler. For tonight's meal, I made them the same way in that post, but I didn't have fresh herbs on hand. I used dried Italian herbs, 2 tsp crushed garlic, 1 tbs tomato paste, minced onion, 1 egg, breadcrumbs, and salt and pepper. Check my recipe on the post for the breakdown of ingredients. It's always easier for me to make meatballs under the broiler because they hold their shape and cook so quickly.

Comfort food in a snap! This meal was not only healthy, quick and easy, but also kid-friendly. Here is how it came together:

Mix and form the meatballs with the ingredients and placed them on a foil-lined baking sheet. Cook meatballs under the broiler, see my original recipe post. While forming meatballs bring 2 medium pots filled with water to a boil.

Pour a jar of your favorite marinara sauce in a large pot and warm it slowing on the back of the stove.

Add veggies such as sugar snap peas in a pot too blanch (4-5 minutes) and add 8 oz of pasta to the other pot and cook per package instructions. I used whole wheat pasta for my meal.

Flip the meatballs to the other side and cook about 2 more minutes. When ready, add to the large pot with marinara sauce.

Drain pasta and veggies. Season veggies with a small amount of butter, salt and pepper. Serve it up! The entire meal takes about 45 minutes start to finish.

Plan ahead for leftovers: For tonight, I made enough for 4 servings so we have 2 servings in the fridge for a quick meal to reheat. Aaron and I put the leftovers away in individual servings so it's easy to grab the meal and go!

Monday, June 22, 2009

Scam or Fab? "As Seen on TV" Produce Saver Bags...

So what are these infomercial produce saver bags and are they a scam or fabulous? My vote - FAB and worth the money! I get produce saver bags from my organic produce delivery company for some items because it's a bonus they throw in for their customers. I never used them before last year when I started the service. Now I love them! So why are they worth the money?

First, if you're eating fresh produce in season, that means the fruits and vegetables are in abundance so you can buy more quantity for less money! This is great for your budget. But when you buy more, the green bags help you keep the produce fresh longer, rather than rotting from sitting on your counter. Sure, you got the green beans on sale, but if they go bad before you eat it, what's the point, right? That's why my delivery service includes bags. They sell them so if you try them, you're likely to buy more from them. But the company knows that it's a practical way to store the produce to keep longer. I get my produce delivered ever 2 weeks and make it last with the green bags. Here are some ideas....

Tips on using produce saver bags:
  • Re-use them as much as 7-8 times.
  • Rinse the bag and dry off inside and outside completely.
  • Store dry bags by rolling them tightly inside a large plastic container to help stay organized. Save until your shopping trip.
  • When you do your shopping, pull out the produce bags and place dry produce inside the dry Green Bags.
  • Store all produce in the refrigerator.
  • For delicate produce like slightly under-ripe pineapple, tomatoes or peaches, keep refrigerator in the green bag until 2 days prior to eating. Take only what you can eat right away and place on the counter to ripen.
  • You really only need to buy medium and large sizes. The large sizes are perfect for your leafy greens, bags of apples, lettuce and medium bags are great for everything else like tomatoes, herbs, peppers, etc.

Monday, April 27, 2009

Busy Week Ahead? Say No to the Frozen Entree! Try this Tasty Enchilada Casserole

To follow-up on my previous post of making black beans in the slow cooker, I thought you'd like to see another way to use the homemade beans.

So many times, I see my coworkers heating up their frozen entree and I look at it and feel sorry for them because...A - they are not appetizing and B - it's processed food typically high in sodium and filled preservatives. Not to mention frozen entrees are expensive per-meal compared to home cooked. My casserole was about $1.25 per serving!

I had an appointment after work tonight and I knew that I would be home late. So last night, I made a huge, tasty Enchilada casserole with my cooked black beans. The casserole makes 8 servings and for 2 people that's 4 meals. This meal is kid-friendly and I have to say Aaron loved it! We had reheated the casserole tonight with leftover vegetables and sliced mango. Then I packed the remaining servings in entree containers (pictured above) to pack a complete meal for lunch. Here's how...

Enchilada Casserole
Serves 8

Ingredients:
  • Cooking spray
  • 12 corn tortillas
  • 1 pound ground lean meat (pork, turkey, chicken or beef)
  • 1 tbs olive oil
  • 1 onion, diced
  • 1 small red bell pepper, diced
  • 1 jalapeno, seeded and minced
  • 2 cloves garlic, minced
  • 1 tsp chili powder
  • 1 tsp dried oregano
  • 1/2 tsp cumin
  • Salt and pepper to taste
  • 3 cup cooked black beans
  • 16 oz mild enchilada sauce
  • 1 1/2 cup shredded cheddar or Mexican cheese mix
  • 8 oz can sliced black olives, drained
  • Low-fat sour cream, to serve

Preparation:
  • Preheat skillet or dutch oven on medium. Chop onion and peppers.
  • Drizzle pan with olive oil and cook onions, peppers and garlic. Add ground meat, crumbling the meat as you cook it. Add spices through salt and pepper. Cook through until meat is brown and no longer pink. Set aside.
  • Preheat oven to 350 degrees.
  • Coat cooking spray in a 9x13 inch casserole dish. Spoon 1/4 cup of enchilada sauce on the bottom of the dish. Reserve remaining sauce. Line 6 corn tortillas in an even layer, overlapping to fill gaps.
  • Spoon black beans on the tortillas in an even layer. Add cooked meat on top of the beans. Sprinkle 1/2 cup of shredded cheese. Layer remaining 6 corn tortilla, overlapping to fill the gaps.
  • Pour reserved enchilada sauce on top of the tortillas. Sprinkle with 1 cup shredded cheese and sliced olives.
  • Place casserole in the oven for 30 minutes.
  • Let cool for 5-10 minutes. Cut into 8 equal servings.
  • Serve with sour cream, chopped fresh cilantro, and sliced avocado, if desired.

Store the leftovers in the individual servings to help with portion control and saving time for future meals on busy days.

Sunday, April 19, 2009

Kitchen Herb Gardens Brighten Your Dishes and Saves You Loads!


Picture this... You're at the store and you spot those small plastic containers of fresh herbs and then have sticker shock from the price for the little amount of herbs! Sometimes, I get it home and I don't use it all because I only used a small amount for a dish.


So....to save money and have fresh herbs available, plant your own Kitchen Herb Garden. I live in a small urban condo, but every spring, I plant herbs in small pots on my balcony. When you have your own herb garden, you will use what you need because pruning encourages the plant to grow.


For less than $20 you can start your own garden and have enough herbs for the entire summer and fall. Fresh herbs are great for...

  • Tabouleh Salad - bulgur wheat salad with cucumber, tomato, lemon, garlic, olive oil, and lots of parsley and mint leaves.

  • Pesto sauce for pasta - use fresh basil and parsley in pesto - see my recent post for recipe and pesto menu ideas.

  • Roast chicken - use thyme, parsley, and oregano - see my recipe.

  • Chili - throw in fresh chopped cilantro just before serving and offer extra for people that want more.

  • Scrambled eggs - try a delicate combination of fresh oregano or tarragon with shredded parmesan cheese or fontina.

  • Garlic & cheese bread - spread roasted garlic cloves on french bread and sprinkle with grated parmesan cheese and chopped parsley and place under the broiler for 2 minutes.

Getting Started - What You'll Need:

  1. Decide which herbs you want to grow based on your food preferences
  2. Potting soil
  3. Seed packets or starter plants
  4. Enough pots for each herb you will grow
  5. A sunny spot in your home (try a western exposure window sill or patio).

It will take about a week before the seedlings to grow and another 3-4 weeks to start picking your first herbs. Try your local garden store for starter plants for rosemary and other herbs that take longer to grow. Be careful to pick off the start of flowers off the tips. When they go to "seed" they turn the herb to a bitter flavor.


For more good ideas and tips on planting your own Kitchen Herb Garden, check out this April 2009 Cooking Light article (photo courtesy Cooking Light).

Tuesday, April 7, 2009

On the Road Again...Don't Leave Home Without These Travel Essentials

I spent the evening packing for my trip tomorrow. I'm going back home to see my family in Northern California. I used to travel all the time for business. These days, I hardly travel, but I have my packing routine to a science! When I'm on the road, I pack things that I can use to keep my healthy lifestyle in check. Here are a few tips that may help you on your next trip, whether your going business or pleasure.

Meals & Snacks/Carry-on:
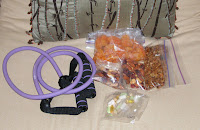
  • Refillable, durable water bottle empty the bottle before you go through security and you can wash the bottle throughout your trip, fill up at water fountains, and save lots money on buying bottled water at the airport.
  • Non-perishable snacks like dried fruit and individual packaged trail mix (shown above) are great because they don't spoil and it's better than buying an expensive or unhealthy snack. Granola is another good idea. You can always find yogurt on the go so you can top it with granola for a quick breakfast.
  • Individual packed wet wipes are great for cleaning your hands after a flight or when there is no soap in public restrooms. I like natural, non-drying varieties.
  • Your iPOD filled with energizing music for workouts is a good idea. I also make sure it's synced with podcasts and fully charged the night before.
  • Meal for flight - don't forget to pack a nutritious meal. I go for a sandwich or salad with fruit. I use disposable containers so I don't have to bring them back with me. Or try these ideas.

Exercise Gear:

  • Sneakers for touring around and you can jog or walk anywhere in the hotel treadmill or city sidewalks.
  • Resistance band doesn't take much space and you can do lot of different exercises in a small space with a band. Check these band exercises out for ideas.
  • Exercise clothing I pack 2 sets of exercise gear and socks and bring linen spray to freshen them. You can use hangers to let them dry after your workout.

Checked Luggage:

  • Sunscreen is essential for protecting your skin. I pack it every time and make sure it's not too old so it is still effective.
  • Vitamins help you keep your energy. You may be getting less restful sleep at a hotel or simply being exposed on planes and public transportation to germs so having your vitamins with you is a good idea.
  • My heart monitor is small enough to pack and I don't exercise without it.

If you have more travel ideas and essentials please send me an email. I'd love to hear them!

Thursday, April 2, 2009

Make the Most of Your Personal Training Sessions

In these economic times, consumers are holding off on non-essential big ticket items like buying houses, cars, and electronics. Personal training sessions can fall under this category. But, working out with a personal trainer has a lot of benefits especially for people need to shake up their routine and access their current fitness goals. I've seen many discount promotions at my gym lately to motivate gym-goers to take advantage. As a budget-minded gal, I think about getting the most value from these workouts.

Now, might be the right time to take advantage of the special offers! But, before you do, consider these tips to get the most benefit from your personal training workouts....


  • Be honest: Before you meet with your personal trainer, be honest with yourself and tell him/her your realistic fitness goals, past injuries, and insights on what motivates you.

  • Do-It-Yourself-Workout: Ask your trainer to create your personal workout so that you can do it alone without your trainer there. Some workouts require complex machines or two-person moves that you can't do on your own.

  • Be a student of your workout: Get the proper form and tips on the moves while your trainer is with you and remember them for when you're on your own. I still pull these out even two years later.

  • Ask for homework: My trainer is great about emailing me the link to my personal workout that I keep on-hand for future. It shows pictures and instructions for times when I'm on my own.

  • Schedule the sessions 1 or 2 weeks apart: This way you can do the workout routine on your own and ask your trainer follow-up questions the next time you see them. You'll be more likely to remember these moves long-term if you do it yourself right your session.

  • Mix it up: Between my personal training sessions, I mix up the workouts and do them on my own.

Please email me your tips that have worked for you.

Sunday, March 29, 2009

Sunday Roast Chicken Dinner Can Speed Up Your Week

One of my favorite dinners is roast chicken for many reasons. It's not only delicious and perfect for a Sunday dinner, but buying a whole chicken is budget-friendly. I bought this 3 lb organic whole chicken for $5 and it made 6 meals for the two of us, which is 83 cents per serving! I cooked the chicken with onions, celery, carrots, and turnips.

Making a roast chicken is best on the weekend because of the long (2-hr) cooking time. The advantage is that you can have a ready-made meal in the refrigerator for quick lunches or dinners. Here is how to do it.

On Sunday
  1. Roast the chicken and veggies.
  2. Carve chicken and serve for dinner. Store leftover chicken in a separate container from the vegetables. Use the bits of chicken from the carcus and set aside for your lunch the next day. You can use these bits for chicken salad sandwiches, chicken and greens salad, or in a quick soup on a weeknight.

Easy Roast Chicken and Vegetables

  • 3 lb whole chicken
  • 6 cups root vegetables you have on-hand (onions, carrots, celery, potatoes, turnips, or parsnips)
  • 1 tbs minced garlic
  • 1/2 tsp spanish smoked paprika
  • 1 tsp dried oregano
  • 2 tbs chopped thyme, divided
  • 1/4 cup chopped fresh parsley (or dried)
  • 2 tbs olive oil, divided
  • Salt and pepper to taste

Need: meat thermometer + roasting pan

Preparation:

  1. If frozen, defrost chicken by filling sink with cold water. Let it sit for approximately 1 hour.
  2. Preheat oven to 375 degrees.
  3. Coat roasting pan with cooking spray.
  4. Rinse chicken and pat dry. Place chicken on a cutting board and rub 1 tbs olive oil on the skin. Season with smoked paprika, 1 tbs fresh chopped thyme, and salt/pepper. Set aside.
  5. Chop root vegetables and slice onions. Place veggies in the roasting pan. Stir in 1 tbs olive oil with garlic, herbs and reserved thyme.
  6. Place chicken on top of the vegetable mixture.
  7. Cook in the oven for 1 hour.
  8. Turn the chicken over and stir vegetables and cook for one more hour.
  9. When you pull the chicken out of the oven, use a meat thermometer to check the temperature. Keep the thermometer away from the bone for accuracy. The chicken should be 170 degrees.
  10. Do not carve right away! Set aside for 10 minutes so the juices stay inside the skin.
  11. To carve, use a sharp knife and cut off the breast, thighs and wings. My advice is to follow the bone. Or if you need more advice, check out this how-to video from PBS.

More ideas to spice up the roast chicken: I've tried many other methods that you may want to try.

  • Make a wet rub and spread under the skin on the chicken flesh.
  • Slice lemons and place under the skin to keep the meat moist.
  • Fill the body cavity with salt/pepper, chunks of onion, garlic, herb sprigs, oranges, or lemons.

Friday, March 20, 2009

Save Time and Money, Pack Your Lunch

Packing a lunch for work, school, flight or family outing is a convenient if you do a bit of planning ahead. Think of the last time you were at the airport. Would you rather have your favorite lunch packed for your flight or eat the random fast food in the food court? I'll take a homemade lunch anyday!

By spending a few minutes before you leave the house, you can reap huge rewards!
  • Save money by not eating convenience foods, which by nature of being "convenient" are priced higher.
  • Save time and hassle of waiting in long lunch lines, deciding where to eat, traveling to the restaurant, etc.
  • Be better to your body because convenient foods are often high in fat, calorie dense, filled with sugar, and in general offer little nutritional value.

Here is one of my favorite quick lunch salad recipes that you can make quickly the night before.

Mediterranean Tuna Salad (Serves 1)

2 cups baby spinach

1/2 6-oz can tuna in spring water, drained and flaked

1/4 cup kidney or white beans, rinsed and drained

4 Kalamata olives, sliced

1/4 cup sliced cucumber

1/4 roasted red pepper-halves, chopped

1 small tomato, chopped

1 tbs chopped red onion

1 tbs crumbled feta

1 tbs thinly sliced fresh basil

2 tbs roasted unsalted pepitas (pumpkin seed kernels)

Fresh cracked pepper

Vinaigrette Dressing:

Whisk together 2 tbs balsamic vinegar, 1 tbs olive oil, and 1 tsp Dijon mustard for a quick dressing. Note: I prefer less oil than traditional vinaigrette. Experiment with your quantities or make a larger batch ahead for several salads.

Directions for Lunch Packing:

Pack the salad in a large resealable container. I prefer the Tall Entree from Gladware. Pack the dressing in an Mini Round resealable container. Pack pepitas in a small snack plastic bag and assemble just before serving.

For more packable lunch recipe ideas, check out this article from the March 2009 issue of Cooking Light.

Sunday, March 15, 2009

15 Tips for Healthy Eating on a Budget

Through my gym, I get a free subscription to Experience Life Magazine. For a free magazine subscription, I get a ton of information and they have a good balanced view of health. In the March issue, there is a great article "How Healthy People Eat Cheap" and it gives 15 tips on eating a healthful, whole-foods based diet on a budget. I especially liked the ideas at the bottom of the article "Spendy vs. Savvy." I do many of these tips already. Check it out!

If I could add one more tip, it would be to buy produce and meat directly from a local producer instead of the grocery store.

  • Find a local butcher store: I buy hormone free meat from a high-quality local butcher store in Indiana when my husband and I visit his family. If you're in the Chicago-area, it's a short day-trip away (2 hr drive). Yoder's Meat Shoppe is in the Amish country of Indiana. Most of the meat is sold in frozen packages. I use a thermal bag to transport it home and I put it directly in my home freezer. We are already visiting the area so we're not going out of the way and the value is tremendous factoring in the price for the quality compared to city prices. The locally raised meat is processed on-site and the taste is unmatched!

  • Buy produce from a local farm or co-op: I have a service that use that delivers organic produce to my front door every other week for 1/2 the cost of buying from the grocery store. I use Timber Creek Farms, based outside of Chicago. With some of these services, you have to plan ahead and place your order one week prior to delivery. My order of a fruit box, veggie box, milk, bread, eggs, and cheese lasts for 2 weeks and I will only have to go to the grocery store for a couple of things that I need. With many of these services, you might have to be more adventurous and eat fruit or veggies that you don't typically.

Buying direct, locally and in-season can save you money and help you support family-run farms.

How do I establish a budget? When I worked as a financial planner, I advised my clients to come up with a spending plan based on their goals, priorities, and to realistically balance against short and long-term savings needs. From there, you can carve out a budget for your weekly grocery shopping.

Balance is the key to everything and to review the value that you gain from from the nutrition/energy versus the cost. If food is your body's fuel and maintaining a healthy body is going to keep you earning your living and doing the things you love, then it's all worth it!